Wednesday, August 31, 2011

Finalizing the shoulders

Up until now, the shoulder seams have merely been basted together (with a backstitch) and the shoulder pads basted in provisionally.

I spent the afternoon "making up" one shoulder. It took me 3 hours. For a single shoulder.

The shoulder seam was opened up, the seam redrawn with a sharp chalk, a strip of lining material basted to one side of the seam, and the seam sewn permanently with the machine. Then the shoulder pad is permanently basted to the canvas. Thereafter the lining is made to cover the pad and basted in place.

See if you can tell the difference. One shoulder has been finalized and the other not.


I need to clean my window.

Sunday, August 28, 2011

Saturday, August 27, 2011

New shears

If I can't impress tailors with my garments, at least I should impress them with my tools.


I was in a local haberdasher and by chance thought of asking them about scissors.

"Is this your most expensive scissors?" I asked, pointing to a pair from Singer priced at RM108.

"No, you cannot imagine how expensive our best are," came the reply.

"Show them to me," I said.

My heart leapt when I was handed a pair that said "Shozaburo" on them. I've been meaning to buy exactly this model online! The cheapest online option for buying this 28 cm Standard Model is RM412 before shipping from Japan. This haberdasher wanted RM330 for it.

I pounced.

There is a nice video here of the Shozaburo factory:

Wednesday, August 24, 2011

MBT comments on TG#4

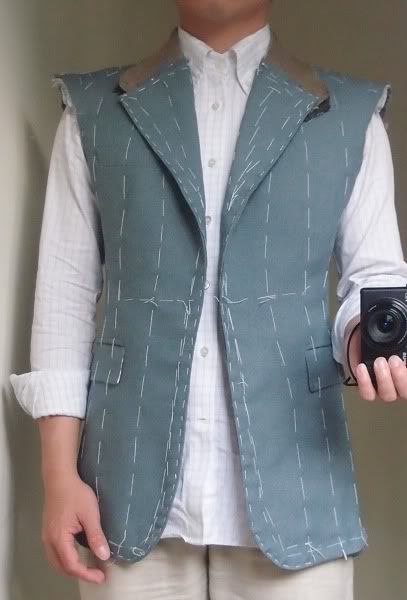
I plucked up the courage and went to MBT today to pick up some clothes and to show him TG#4. I took out TG#4 and put it on his table. He had this bemused expression on his face as he poked at it.

"You sewed this?" he asked. I said yes.

"Who drafted the pattern for you?"

When he heard that I drafted the pattern myself after having taught myself how to from an old German text, his face became dead serious.

"Buffalo horn shoulders," he remarked. He went to a mannequin and took off the display jacket and draped TG#4 over it.

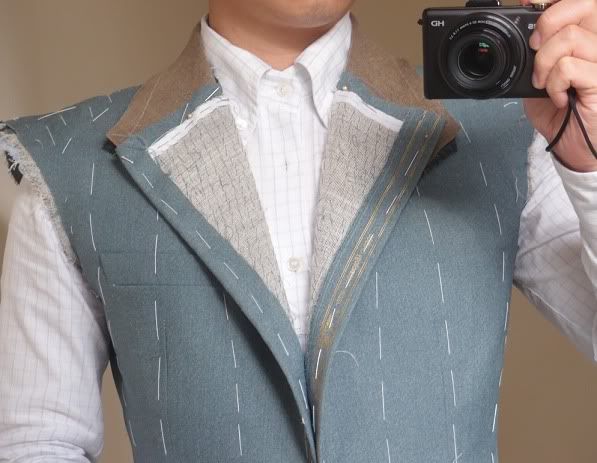
"See, the collar is pulling away," he said as he pinched the collar and it readily separated from the mannequin's neck. "The back is pulling the fronts away towards the back." I said yes, the front balance was long but did not agree with him about the collar pulling away.

I was surprised and disappointed that he would do a fit critique with the garment on a mannequin. After all, it was cut for me, not a mannequin.

He pinched about 3/4" between his fingers at the shoulder seam near the neckhole. The quarters closed.

"You can take it up at the shoulder seam. When you do that you need to drop the lapels by the appropriate amount and lengthen the hem. The other option is to take out a gorge dart. Another way is to draw the bridle."

I wanted to tell him that I have already drawn the bridle, and taking out a deep gorge dart on top of the tight bridle would probably make for a very concave lapel crease edge. But I did not because he was criticizing the sewing next.

"Is this the first time you have sewn?" he asked. I said yes. I know that the quality of the sewing is probably the weakest aspect of TG#4.

"See how this seam here wasn't sewn smoothly. It's better on this side." At this juncture his wife joined us. She said the sewing is bad, but for the first jacket and the first use of a sewing machine it is considered good.

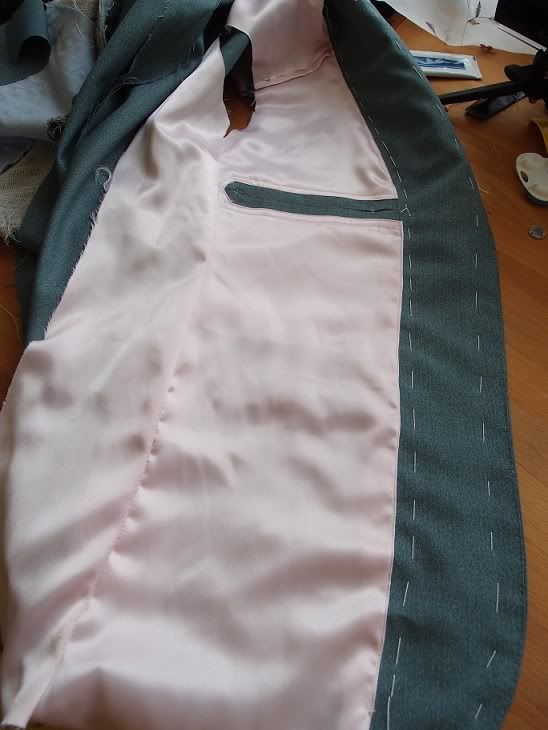
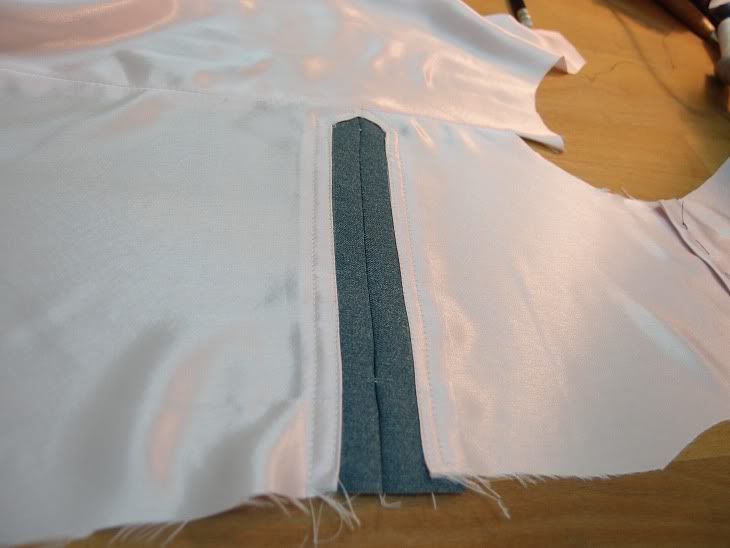
I told him how much effort the cross pockets took. "You need to press the seam here open," he said. I was not too interested in hearing his views about pockets because I followed Cabrera to the letter on this and all other methods of constructing pockets are pretty much inferior. "And you always need to tack the pocket ends, otherwise they unravel very quickly," he said.

I said I intended to do a D-tack.

"A machine tack is OK too," he told me.

He took off TG#4. I offered to put it on and did so.

There was a marked change in his expression. He was surprised. It was then that I realised something. He had thought all along that I have used a generic pattern that is proportional. What he saw now was that the jacket was fitted to me and wasn't just cut from a ready-made pattern.

He has a certain look now to his face that I cannot decipher. His eyes were looking at the waist.

"Yeah I know it is very waisted," I said. He didn't say anything.

His eyes wandered to the armpit area. Seeing this, I raised my arms to help him see the side body.

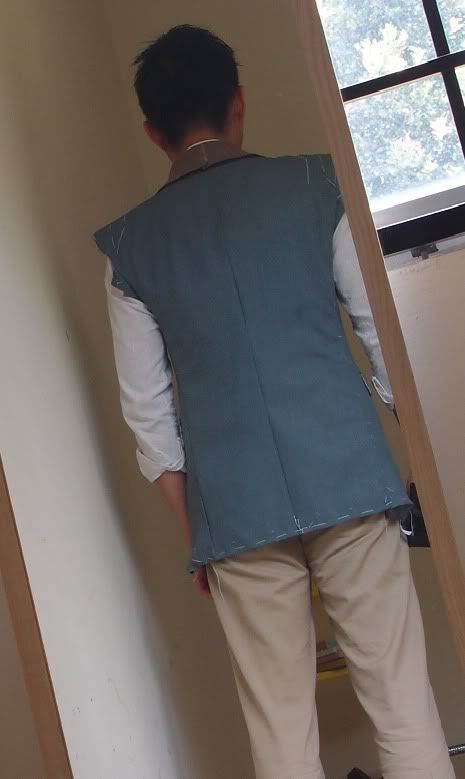
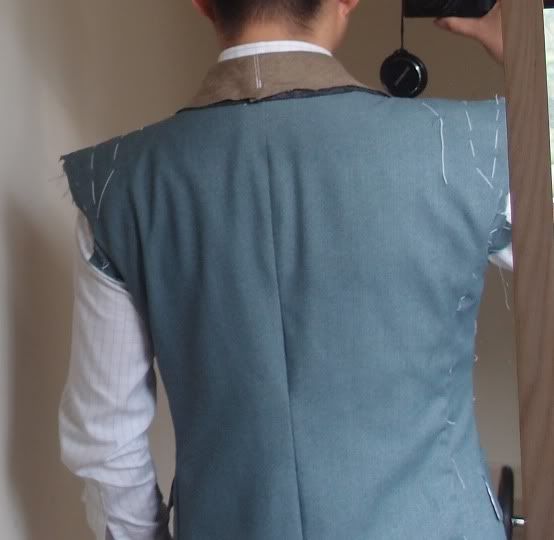
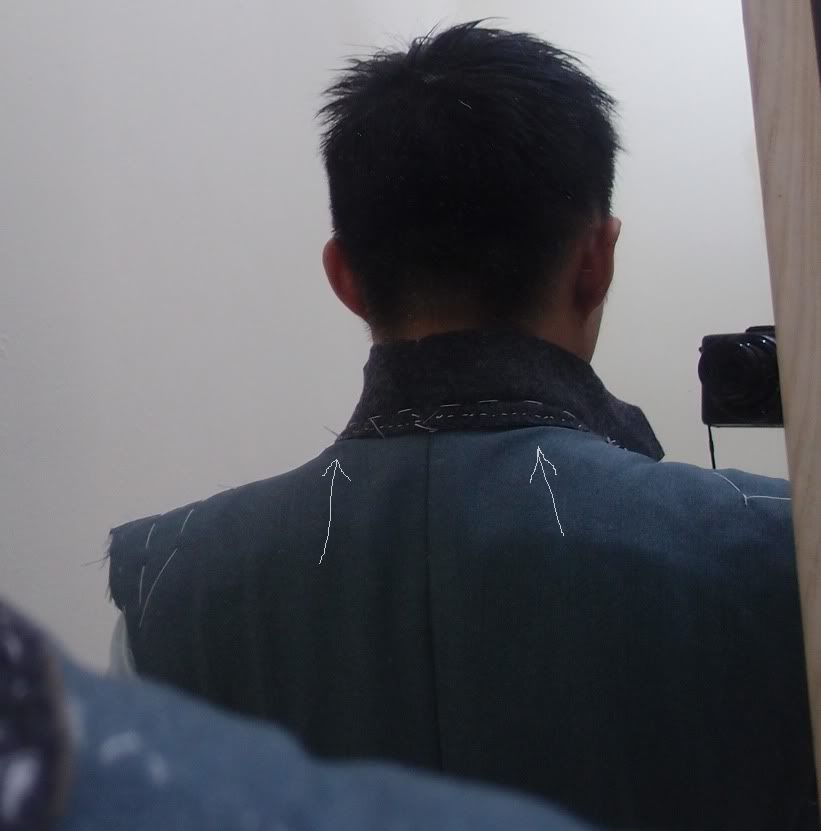
He turned me around and started looking at the back. He looked without saying anything. I broke the silence by saying that I had budgeted wrongly for the back hem inlay because there is scarely enough there.

"The back is short," he remarked and retired to his chair.

I took off TG#4 and while I was doing so he went rummaging in his workshop.

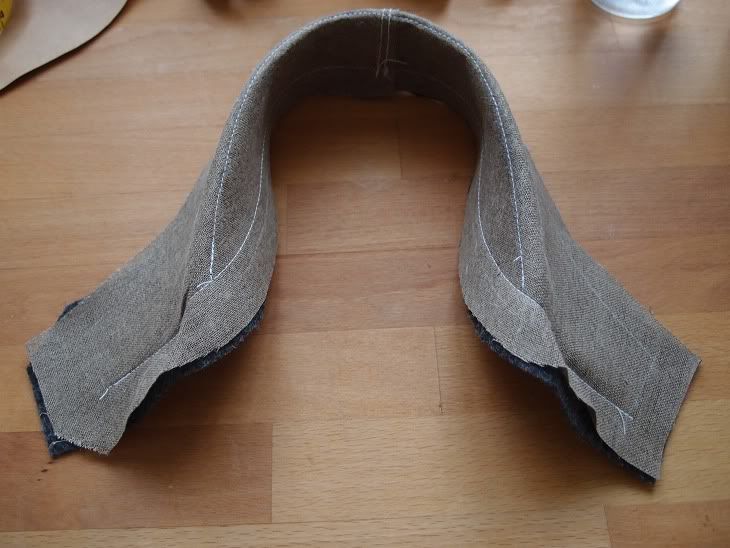
"I have something to give you. You take it home, inspect it, then tell me what you learn," he said as he handed me a black collar felt that was a reject from a jacket. I held it and he grabbed it back. He laid it over TG#4's collar.

"This is how a collar should be like," he said. I asked if there was something wrong with my collar.

"Yes, it should be such that you can just sew this end to the lapel," he replied.

Relieved, I told him that my collar is oversized and have generous inlays and that I will trim it to size after the pad stitching.

"The jacket is OK for someone not from the trade," he pronounced.

Tuesday, August 23, 2011

The front edge of a coat

If you constructed your jacket the way Cabrera has you to, there is no structural need for any pick stitching on the front edge of the jacket. The edge tape and canvas are both felled to the bottom of the lapel, and as such very firmly fixed. The facing is sewn by machine to the bottom of the lapel. Any pick stitching here is to create a crisper edge and is really just decorative.

But if you do things the fatto a mano way, the hand stitching along the edge of the coat is 100% structural. Without it, the entire facing would fall off. The facing is attached to the lapel entirely because of the hand stitching along the front edge. Cabrera says to use a "slip stitch", but there is no satisfactory explanation of what this is. He has a diagram illustrating the slip stich but I fail to see how it is applicable to the front edge. Hostek says to use a backstitch, a stitch I am familiar with so I went with it instead.

The front of the lapel

The underside of the lapel

I used polyester thread for TG#4 to avoid the expense of silk thread.

Supplies

I went to a tailor's trimmings shop today in the seediest building in the seediest part of KL. The place is occupied by mamak stall foreign workers. The conditions in the building are, however, one step above those in a deportation camp.

But inside is a shop every tailor in KL goes to get their trimmings supplies. It is a small shop, filled to the ceiling with stuff and has scarcely enough room for one to move around.

I saw a very nicely made Japanese chalk sharpener for RM32 there, but ended up buying one at RM55 that according to them was "homemade in Singapore". Apparently, it works a lot better and they use it themselves. See for yourself.


This product of Singaporean cottage industry has what appears to be a modified Daiso container to contain the chalk dust.


I found lots of stuff there that no haberdasher with a shopfront would care to stock.

In particular, the body canvas with the amber stripes is very impressive. Totally uncrushable, springy and quite light. I think I bought 2m of it. The lighter body canvas is less impressive. I also found there several varieties of cotton shoulder pads.


I bought a few coat hangers for RM2.60 apiece and a suit cover. They offered to print the name of my shop on the hangers! Without a shop, I could only refuse.

Sunday, August 21, 2011

The Radically Curved Side Seam

I found this pic of a cashmere jacket in the making by Rubinacci on permanentstyle.co.uk. I am shocked by how incredibly curved the side seam is. I suspect there is something about the side seam and waist suppression I do not know.


Thursday, August 18, 2011

The Concave Shoulder

I was watching the French movie "Potische", when I saw this incredible example of the concave shoulder and just exquisite tailoring in general.


Wednesday, August 17, 2011

Tuesday, August 16, 2011

The feel of a jacket

What is never apparent from pictures of suits is how they feel on the wearer.

When I hold a jacket, I am as interested in how it feels when squashed as how it looks and the caliber of the workmanship.

I do not like a heavy jacket with an armoured chest. I much prefer a soft, light, springy and supple jacket with a readily deformable shoulder and chest with lots of memory so they spring right back when worn. A light shell of a jacket, not a carpet you drape over your shoulders.

Look at this coach's jackets shoulders. They deform only begrudgingly and sometimes not at all.


But look at this man's jacket shoulders. The chest and shoulders deform easily, but spring right back when the forces are removed.


Some of these Japanese coats I have are in fact very soft in the chest but the fabrics are not advanced so there is a dead feel to them instead of the springiness I am looking for. They are soft, but not supple.

I have this hypothesis that the cotton felt used in the chest area makes for the dead, carpety feeling -- as is the use of some grades of chest canvas. A truly springy yet deformable chest canvas backed by a shirting weight twill cotton domette ought to be ideal. Cotton shoulder pads without the pellon muslin and loose hand padding would take care of the shoulders. Obviously, no concave shoulders are possible with pads like these.

Both facings now

Monday, August 15, 2011

The Facings: Part 2

Attached one facing. The jacket looks even more polished now!

Sunday, August 14, 2011

Facings

The facing refers to the piece of cloth that covers the front of the lapel and which extends into the inside of the jacket next to your chest. The word is mostly used in the plural.

It is time for TG#4 to receive the facings. First, I created a facing pattern then cut out a piece from garment fabric.

The lapels need to be prepared to receive the facings by having the seam allowance trimmed to 1 cm (less at the notch) then folded over the lapel edge and sewn with a diagonal stitch.

Cabrera offers two methods of attaching the facing, by machine or by hand. I chose to go the fatto a mano way.

Saturday, August 13, 2011

Buttons

I had a walk around KLCC today.

I have always admired the light fawn buttons used by Hugo Boss in their summer jackets. They look like a highly prized quality of jade the Chinese call "mutton fat".

They used an interesting opaque white naval-themed button on their navy suit (!).

Dunhill was less successful in their button selection.

The absolute highlight was the button used by Brioni.

Fitting the back


Finally, after such a long time, the back will be fitted. Except that it doesn't seem to need much fitting.

The back of TG#4 has always been a war zone. Earlier on in the muslin stage, I had the back balance reduced very dramatically -- by something like 4 cm -- and yet it looked awful. Yet the back is marvellously clean the moment I scooped out the armhole and inserted the collar.

I have come to believe that a jacket should only be fitted with
a) the canvas inserted
b) the collar inserted
c) and the armhole close to final shape.

Without the canvas, chest drape is likely to manifest itself as excess front balance. Without the collar, the lapels are not suspended, giving the very real impression of excess front balance. The back panels are also badly suspended without the collar, forming all kinds of strange creases which are difficult to diagnose and which cause much anxiety for the fitter. The armholes, if not low enough or not properly scooped out, cause distortion elsewhere in the jacket.

I have no faith whatsoever in the utility of the uncanvassed muslin trial garment as a basis for fit. It was downright misleading and difficult to read in my case.

It is a miracle how the back has turned out given that I had to adjust the pattern by peering through the fog of creases and distortions that are inherent in the uncanvassed, uncollared trial garment.

You may also notice that the back does not look very suppressed. I have never understood why tailors use the side seam to do all the waist suppression while taking out a tepid 0.5" from the front darts and a minor amount from the underarm seam. I did things things in reverse here: the side seam is supressed less than the underarm seam and the front darts are 3/4".

Wednesday, August 10, 2011

Scooping out the armhole

I drafted the pattern for TG#4 with armholes about 2 cm lower than my armpit. With its half inch seam allowance, the armhole always felt tight. I enlarged the armhole by lowering it in quarter inch steps. By about the third iteration, the jacket had a quantum leap in comfort. The armholes of my shirt were no longer catching on the jacket’s armholes. The jacket felt so much more comfortable to wear.

Next on the to-do list is to transfer the shoulder width from another jacket of mine to TG#4. With the shoulder width determined, I will then try to chalk a harmonious armscye.

Sunday, August 7, 2011

Fitting the undercollar: Part 2

A new collar as well as a tuck to the CB seam near the neckhole solved the fit problem.

Here's a view from the front.


The Undercollar: Part 4

It became apparent to me that the first undercollar pattern was wrong. The collar stand was too short, something like 0.5". So I drafted a new pattern today.

Unlike with the first collar, I will be making it according to Hostek. Cabrera's method assumes a collar pattern that is very mature, essentially plug and play. Hostek's acknowledges that adjustments to the collar pattern are inevitable and allows for more flexibility.

Here's the new collar:

Saturday, August 6, 2011

Fitting the undercollar

I'm having the toughest time ever fitting the collar. This is the time I feel the need for in-person coaching the most. Simply put, there are very heavy creases around the neckhole.

Was it due to an overly small neckhole? Was it due to an overly high neckhole? Is it a problem to be corrected from the upper center back seam, the shoulder seam, or does it entail merely scooping out the neckhole?

I drew a larger neckhole and rebasted the undercollar. The problem was ameliorated somewhat, but the creases were still very heavy and ugly (about 3/4 inch of excess). I then drew an even larger neckhole -- it appeared to me comically large -- and let the neckhole creep into the shoulder seam by about 3/8". The creases decreased in severity further. Then I though maybe the problem was the seam allowance -- all that cloth obstructing the neckhole from lying flat, so I snipped into the seam allowance at the neckhole and loosened the stitches at the CB seam and shoulder seam. Then I adjusted the shoulder seam, drawing in about 1/2" of the back panel near the neckhole to nothing at the shoulder tips.

After all that trial and error, the results are much better but still far from perfect:
The white arrows point to the areas of concern.

What I'll try next is to take in the upper CB seam by about 1/4" on the double at the neckhole to nothing 2-3" below it..