Thursday, April 28, 2011

Hymo and haircloth

Received an envelope from Germany with a small length of hymo (too little for a jacket) and a Hänsel Orange haircloth.

The Hänsel is stiff and prickly -- definitely need a cotton flannel domette with this -- but the hymo is soft, flowly and supple. Too bad there is so little of it.

Thimble

There was a lot of moping about on the Cutter and Tailor's forum about not finding good thimbles. I managed to buy on ebay what I consider to be a magnificent thimble. It's very old, and is steel on the outside and silver on the inside with deep small pocks. It doesn't feel like a rolled sheet metal piece. It feels like a goldsmith sculptured it. It is very heavy for the size. The silver lining is not plated on -- it's a lot of silver rolled on the steel sheath.


Wednesday, April 27, 2011

Dissecting Taguchi

I went out and bought two Japanese fully canvassed coats for the purpose of dissecting them. The first is a Taguchi, from Osaka apparently.
Of the two, this is the most mechanized in construction.
I had the revelation of my life when I saw the chestpiece. So this is how you canvass for a corpulent figure!!!
Notice how low the haircloth goes to, all the way to the bottom of the lapel. Essentially, instead of ending at the chest, the haircloth goes all the way to the belly, in order to prop up the jacket and prevent collapse at the stomach area.

The bridle is a woven fusible
And instead of an edge tape at the edges of the lapels it uses a narrow strip of grey fusible

Saturday, April 23, 2011

Friday, April 22, 2011

Supplies

In the process of ordering these. Quantities are in yards where cut lengths are concerned and in pieces if discrete.

1 Light Weight Hymo 68"
1 White Heavy Weight Collar Interfacing - Non Fusible
1 French Collar Canvas
1 Hair Cloth
2 Silesia Cotton Pocketing 45" - Gray
1 Undercollar Felt - Wool/Rayon - 38" - Gray
1 Chest Felt Non-Woven 45" - Black
1 Chest Felt Non-Woven 45" - White
1 Tailor's Ham
1 Moleskin Hand Press Pad
1 Tailor's Edge Tape - Black, Width - 3/8"
5 Ban-Roll (White), By the Yard - 1.25"
4 pairs Tailor's Covered w/Muslin & Pellon - 1"
1 Covered Wood Ironing Board, Length - 30"
1 Seam Roll
1 Gutermann A302 #100 - Black
1 Gutermann A302 #100 - White

Wednesday, April 20, 2011

Oaktag Pattern #3 (back panel)

I was supposed to take it easy today. Pamper myself. Watch a movie, drink excellent coffee, look at nice clothes, etc.

But the rice farmer work ethic took hold of me and I hammered out the back panel of Oaktag Pattern #3. The problem was that I applied Müller & Sohn's (Rundschau) pattern alteration for the over-erect figure and I just wasn't happy with the way the pattern came out distorted. The method is OK for 1/2" corrections, but in my case it was 4.5cm less back balance. Too much to be handled by the old pattern. The was very significant neckpoint migration, shoulder slope change, and armhole shortening.

It took me a long time to figure out how to compress the top of the back panel. Turns out that you don't. In the 50's Müller & Sohn system there is the part where they say "normale Einstellung 4 cm" between G-G1. To shorten the back balance you reduce the distance between G and G1. I settled on 0.5 cm.

Tuesday, April 19, 2011

Ah, the stress

I used to be fresh as a cucumber on Mondays when I go to work. I would pamper myself on weekends; sleep till late, have a very nice breakfast at a good cafe, a good dinner, go shopping... basically avoiding any kind of stress and not producing anything.

But ever since I started spending my weekends cutting and sewing, I find myself unable to regenerate in time for the work week. It culminated in yesterday and today: I felt very bad yesterday and had to take a day off today to recuperate.

I have a rather high-performance day job and I think I am not the sort of prolific character who can deliver on all fronts.

Monday, April 18, 2011

The God of Tailoring comments

Schneidergott comments:

Hi, Jeremy!

Thank you for the link. A few tips to make your life easier when drafting and sewing.

Take pictures of and for yourself in a tight fitting shirt and some trousers with a belt. Have a straight line in the picture for guidance to set the picture to an correct 90° angle. Take shots of front, side and back and have a close look at them.

All humans are unsymmetrical, some more, some less. Unless there is a severe distortion of the spine, the side with the lower shoulder usually has a stronger hip. If you do not compensate for that in your pattern the coat will rest on that hip later.

Get yourself measured properly. Immensely important are the balance measures. Start with a string or tape around your natural waist, make sure it's the same distance to the bottom all the way around. If you don't have one of the special "Lotmaßband" just use an ordinary measuring tape and attach something heavy to one end.

Using that tape around your waist as a starting line (use the point where the spine meets the tape) measure from there up to the nape at your neck and to your outer shoulders (across the blades). Do the same at the front.

When you have your proportionate draft apply those measures. Also, skip the front lapel dart, you don't need one.

And of course you are right about the pattern being too crooked in the front. It's easy to correct. Make a cut from about 1/2 the front armscye depth to the centre front line. The pivoting point will be at 1/2 of that line, or just lengthen the front chest dart further up. Now close the new dart at CF line until you get the front neck point to the position you need (from seeing the pictures I'd say about 1cm at the dart). The armhole will become slightly bigger (by the same amount you pinched away at the CF), keep that in mind when drafting a sleeve or using the pattern you might already have.

D.
Once you have the balance right, the rest is a piece of cake! :Big Grin:

Sunday, April 17, 2011

Thread tension

I have never used a sewing machine until I bought one a month ago. Using it is complicated and unsatisfying. The seams would all pucker.

Until today. It turns out that the thread tension selector is crucial to making seams that are relaxed.

Changes to Trial Garment #3

I opened up the shoulder seams by 1 cm on the double from the tips to nothing at the neck.

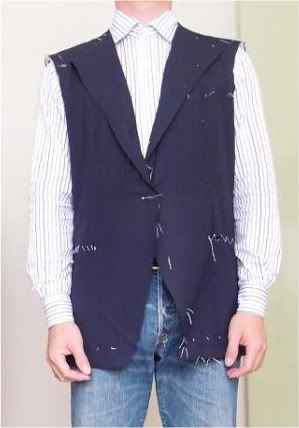
All of a sudden the shoulders fit! The right shoulder is now concave! Please ignore the left shoulder for now. I discovered that I had made 2 right shoulder pads instead of one right, one left. So the left shoulder actually has a shoulder pad made for the right shoulder inserted. Which explains why it looks odd.

Now that the shoulder angle is right, a bunch of other fit problems revealed themselves. These are global problems.

Obvious is the excess of back length, despite my having pinned it up by 2 cm. The back only cleaned up after I pinned it up by 3 cm at the top CB seam tapering to 2 cm near the rear side seam, plus an additional 1.5 cm at the waist.

Looks much better, no? The back has the right balance now, and when I observe myself in the mirror the back looks just right.

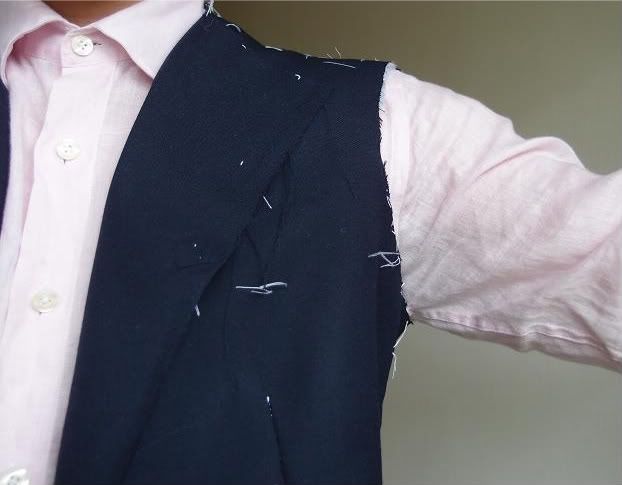
The front, however, is far too crooked.
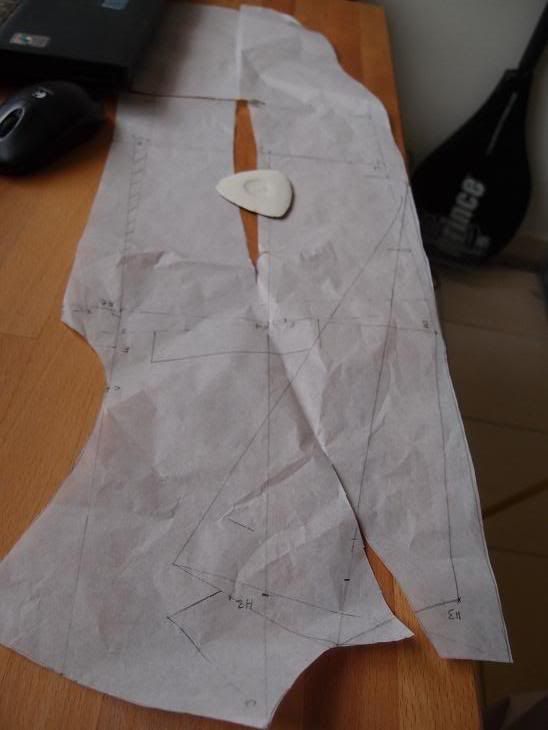
In the draft I made e-e1=1.5 cm instead of the prescribed 0.5 cm. The result is a front that is swinging away, and a neckhole that sits far from the neck. (The right shoulder doesn't look that concave viewed from the front. I wonder why?)

So I had to straighten the neckpoint. I used Cabrera's method of slashing the pattern above the dart and overlapping the edge of the front panel by 2 cm.
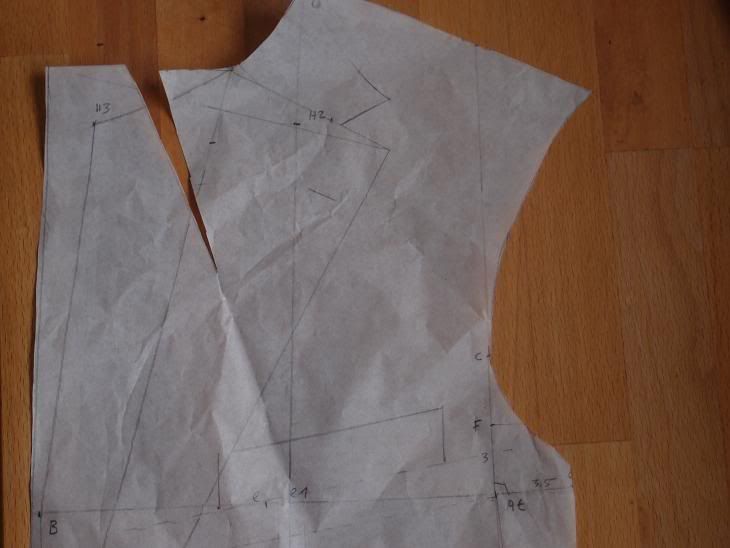
(Here you see the slash before glueing.)

The more observant amongst you will also have noticed that the rear neck syce is too low. The Rundschau would have resulted in a higher rear neck syce but I had made it lower by 1.5 cm. Mistakenly, as it turned out.

I bought some Japanese polyester suiting cloth just now for the next Trial Garment. It's a nice mid blue. The next trial garment will be much better!
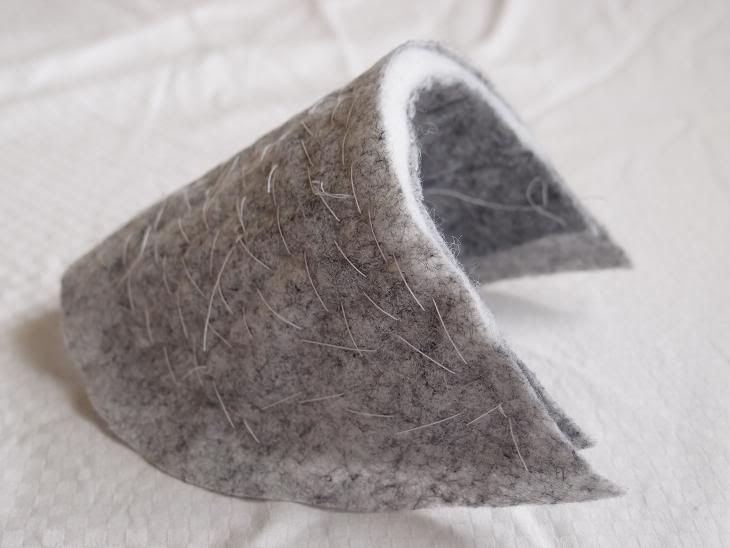
Friday, April 15, 2011

Sourcing conundrums

I spent 2 weeks compiling a list of things to order from Ely Yawitz. Upon submission of my order I was told that they do not deliver outside the US. What a setback.

Anyway the past week at work was political and contentious and I have difficulty finding enthusiasm for my jacket project this weekend.

A punch for making holes in paper patterns.

Monday, April 11, 2011

Reflections on Trial Garment #3

I made the rear side body seam, above the waistline, concave. On the pattern. It's about 4 mm less (on the double, i.e. 2x) at the point of maximum concavity. I hope this is enough to remove some of the excessive upper back drape.

I also plan to add more suppression by taking in a further 5 mm on the double at the rear side seam. That would take off 3/4" from the waist.

I should also sew up the gorge dart.

This week will be about modifying Trial Garment #3 to be more satisfactory.

Sunday, April 10, 2011

Trial Garment #3

Spent 5 hours today sewing this up, fitting myself (it's much easier to fit others than onerself) and taking pics. From oaktag pattern #2.

Clearly, buttoning point needs to be lowered, shoulder tips opened 1 cm on the double, and the back balance shortened 3/4" as already pinned up. Also, something went a bit wrong with the dropped shoulder correction because the right armhole was very tight. I may add a bit more waist supression.

I think the next trial garment can be made in a kid mohair cloth. With canvassing!

Thursday, April 7, 2011

Hostek's book arrived

It is often useful to have a topic illuminated from several angles. I have had Cabrera for a few months; today Stanley Hostek's book joins my library.

It is pictured next to a pair of vintage 10" Italian shears that belonged to my grandmother, one of very few things I salvaged from her house in Cameron Highlands before it was sold. It is in need of refurbishment.


Here it is next to Cabrera.

Wednesday, April 6, 2011

Stretching the suppressing seams

I noticed today that the Rundschau has you stretching lengthwise every seam that creates the waist suppression. Clearly, this is to minimize the effect these have on creating balance shortness. However, I have already anticipated this shortness by cutting the jacket crooked.

I'll still stretch them. But I think I may not need to.

Project milestones

I think these would be the order of milestones for this project:

Perfected trial garment in a wool-kid mohair cloth
First jetted pocket
First pair of muslin trousers
Canvassed trial garment
Canvassed jacket torso in final cloth
Jacket with collar mounted
First muslin sleeves
Finished jacket

Monday, April 4, 2011

Oaktag Pattern #2

After the disaster that was the preceeding trial garment, I went back to the drawing board to produce Oaktag Pattern #2.

With this draft, I assumed that there is no seam allowance except at the rear side body seam.

So I was cutting the cloth based on this pattern when it came time to apply the right dropped shoulder correction a la Cabrera. It turns out that Cabrera's method cannot be applied to a pattern without seam allowances! Bummer. I had to scrap so much cloth.

Because of this, I drafted another 3 panels specifically for the right side to take account of the dropped right shoulder. Essentially I applied Cabrera's method, but instead of doing it to the cloth I did it to the paper pattern. I copied the profile of the left panels, then made a horizontal cut through the chest portion from end to end of the paper. I then overlapped the paper 0.25" at the rear side body seam to nothing at the front edge of the front panel. I glued the overlap and reinforced the cut with a strip of paper glued on.

This meant I had 6 pieces of paper for one jacket. A set of 3 for the left side of my body and another set of 3 for the right.

This jacket was cut rather crooked. Distance from e1 to e is 1.5 cm instead of the prescribed 0.5 cm. My understanding is that the more suppressed the waist is, the more crooked the jacket needs to be.

The waist supression is agressive. 2 cm front darts. 1.25 cm supression each side on the front side seam. 2 cm each side on the rear side seam.

There is a gorge dart too, to add convexity to the chest.

Seam allowance

Trial Garment #1 was sewn on the chalkline, even on the rear side seam where it is obvious to me now that I was supposed to sew 0.75cm inside the chalkline. But Schneidergott wrote that certain seams already had seam allowance, so on Trial Garment #2 I sewed 0.75cm inside the chalkline. The results were a disaster -- I couldn't pin the front close! It was that tight.


The next day, I measured my chest girth on a whim. I found that it grew 4 cm between my first Rundschau draft and the second.

It was therefore necessary to come up with another draft.

Trial Garment #2 pictured above had really agressive waist supression, due in part to wrong thinking about darts. The darts measure 3 cm in width.

Cabrera's method for dropped shoulder correction was dutifully applied, except that it was applied to the right shoulder. His book illustrated the case for the dropped left shoulder. You start out as prescribed until the point where you have inserted the first row of pins.
 And now you deviate: You turn the cloth over and gather that side instead.
 Secure the ripple with another row of pins.

Oaktag?


Bespoked in 1U has a couple of hundred patterns as part of their shop deco. Thing is, they were drawn on what is called chicken skin paper, a thin but strong wrapping paper. One thing I've learnt from using thin paper for the pattern is that it doesn't guide the chalk the way a thicker paper does. Then one day, I chanced upon a source of thick brown paper. It's the kind used as covers of exercise books.

This past weekend I found yet another source which was thicker and darker.

Shoulder pads

It's impossible to source cotton pads in KL, the best I could find are those made of polyester wadding. My first attempt at making shoulder pads:
I cannot however use these because they are not concave. I have since attempted to make concave shoulder pads a la Cabrera but I do not think they are successful.

A blog to document my progress

Started this blog today to document my progress in making a jacket. The drafting and ironwork system will be Rundschau; making up will be Cabrera.

One of my earlier drafts on tracing paper...


And the trial garment made from it